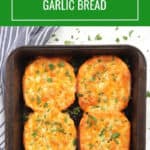
Homemade Easy Cheesy Garlic Bread


Last Updated on September 10, 2020 by Betty Davies
When you are running short on time, this easy cheesy garlic bread is a life saver! Just 4 simple ingredients and it’s ready to serve in 15 minutes. This homemade side is perfect to accompany so many main meals.
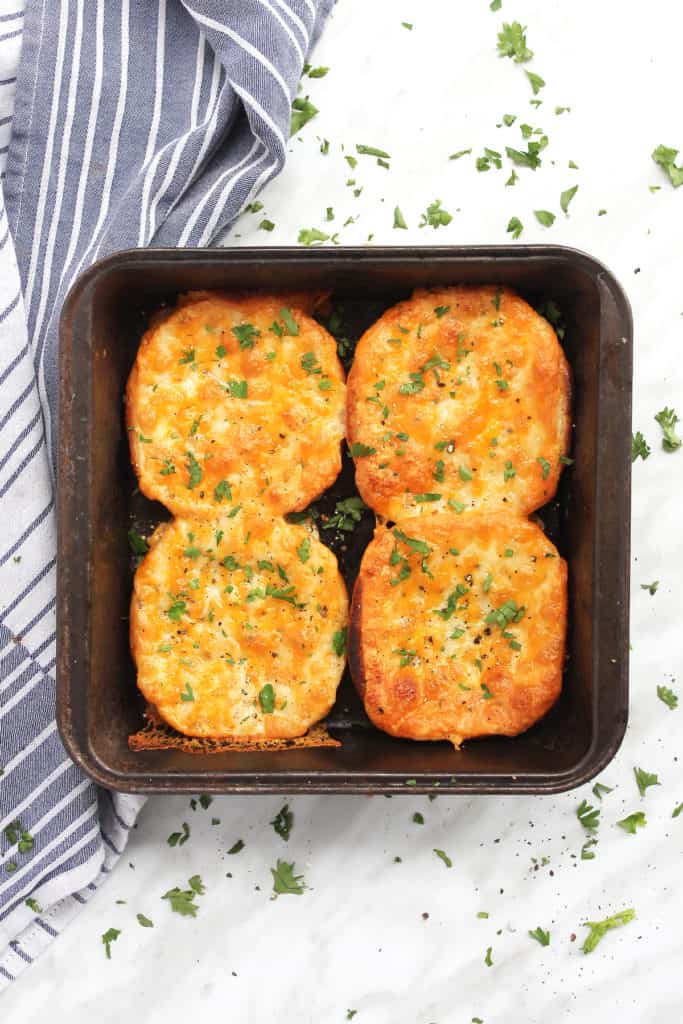
I will never say no to garlic bread when it’s offered as a side, especially when it’s loaded with melted cheese!
This vegetarian bread side can be served with so many mains or enjoyed as an appetizer. Bursting with fresh and bold garlic flavors, this is a side you will make time and time again!
Why you will love this easy cheesy garlic bread recipe!
- Quick: Just 5 minutes prep and 10 minutes in the oven and you have a tasty side on your hands!
- 4 Ingredients: Nothing fancy here! Just a few simple ingredients to make the most yummy cheesy garlic toast!
- Delicious! Garlic, cheese and soft white rolls with crispy edges. What’s no to love!
Ingredients
- Butter: It’s best to use salted butter for this recipe. If you use unsalted, you may want to ad an extra pinch of salt when you are making the garlic butter.
- Garlic: Use fresh garlic cloves for a strong flavor. Three cloves gives each bite a good garlic kick, but you can use more or less depending on your taste.
- Black Pepper: Fresh cracked black pepper adds a nice burst of flavor.
- Rolls: I used brioche buns, but any soft white rolls will work well.
- Cheese: Use the slices of cheese that you can quickly lay on each roll. They create and even layer and total cheese coverage!
How to make cheesy garlic bread
Be sure to scroll down for the full recipe!
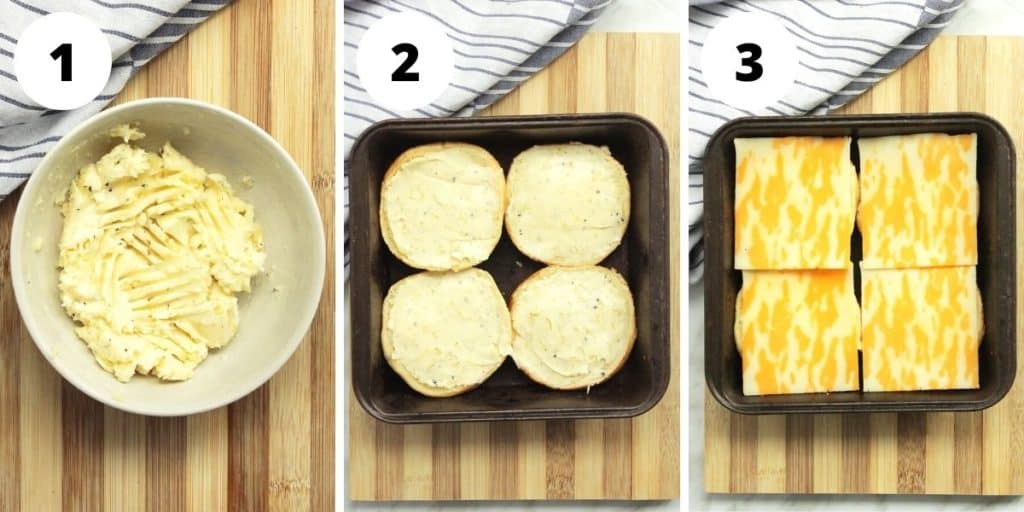
- Mix together the ingredients to make the garlic butter (photo 1).
- Spread the mix over the rolls (photo 2).
- Top with cheese (photo 3).
- Bake until golden brown and the cheese is bubbling.
Recipe Variations
This easy cheesy garlic bread is pretty yummy as is, but there are a few changes you can make to suit your tastes:
- Make it gluten free by using GF rolls.
- Mix up the cheese. I used a marbled cheddar for a wonderful color, but you could use mozzarella for really stringy cheese or a sharp cheddar for a real hit of flavor.
- Add in some herbs. I garnished the garlic bread with fresh parsley, but you can also mix in a tablespoon or so into the butter.
- Switch up the bread: I love the convenience of using rolls to make this recipe, but you can easily go more traditional and use a French baguette if you prefer.
Frequently Asked Questions
This garlic bread is best served straight out of the oven so that the cheese is soft and melty. You can make the butter up to a week ahead of time and keep it covered in the fridge. You can also build the bread with the butter and cheese up to a day ahead of time and keep it covered until you are ready to cook.
If you do have leftovers (unlikely haha!) place them in a sealed container and keep it at room temperature for up to 2 days. To reheat, cover the bread with foil an place in a preheated oven at 350F for about 10-15 minutes until warmed through.
Garlic bread can be traced back to the Italian bruschetta, but in this form, it’s very much an American side dish recipe.

Serving Suggestions
I won’t lie, I can eat this garlic toast by itself and you can easily serve it as an appetizer, but it’s also great paired with dishes like:
- Tomato, cauliflower, mushroom or onion soups.
- Pastas like creamy lemon salmon or pasta bake.
- Stews
- Steak
Recipe Notes and Tips
- Soften your butter before using it. This will make it much easier to combine with the garlic and spread more easily. Take your butter out of the fridge about 30 minutes before you need to use it.
- Watch closely when the bread is in the oven and under the boiler. It will cook quickly, so take care not to burn the edges.
More Easy Side Dishes
If you’ve tried this recipe, be sure to leave a star rating and a comment below!
Keep up to date, by following me on Facebook, Instagram and Pinterest!

Homemade Easy Cheesy Garlic Bread
Ingredients
- 1/2 stick salted butter softened (55g)
- 3 garlic cloves minced
- cracked black pepper
- 2 brioche buns or dinner rolls cut in half
- 4 cheese slices
Instructions
- Pre heat the oven to 460F / 240c
- In a bowl, mix together the butter, garlic and about 6 turns of cracked black pepper. Combine well.
- Spread the butter mixture evenly over each half of the buns.
- Place in a baking sheet and top each roll with a slice of cheese.
- Place in the oven for 5 minutes and then transfer to under the broiler (grill) for another 5 minutes until the cheese is bubbling.
- Let sit for a minute or two too cool before serving.
Notes
- Soften your butter before using it. This will make it much easier to combine with the garlic and spread more easily. Take your butter out of the fridge about 30 minutes before you need to use it.
- Watch closely when the bread is in the oven and under the boiler. It will cook quickly, so take care not to burn the edges.